Friday, December 21, 2012

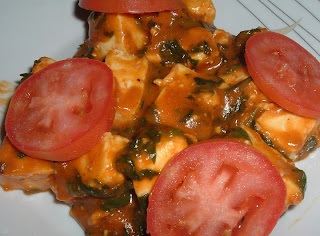
PANEER WITH SPINACH


An Indian recipe for today. A recipe with Paneer, a typical Indian cheese. You can find it in Indian stores and in many supermarkets nowadays. I hope it is not very difficult to find for you.

Ingredients:

10 oz spinach
16 oz paneer
Some extra virgin olive oil
½ teaspoon ground cumin
½ teaspoon turmeric
½ teaspoon ground Kashmiri red chillies or hot pimentón
1 tablespoon chopped fresh ginger
8 oz crushed tomato
1 tablespoon flour, dissolved in some water
4 oz milk or cream
Some salt to taste
4 slices of tomato

Start preparing the spinach. To do that, wash them and remove the stalks. Then put the spinach in a pan with water. Bring to a boil and cook for 5 minutes. After that, remove the spinach from the pan, drain it and cut it in little pieces. Reserve the spinach.
Now take the paneer and dice it. Next, put some oil in a pan, heat it and cook the cheese for about 4 minutes. Remove the cheese from the pan and reserve it.
In the same pan, and after turning the fire low, put the cumin, the turmeric and the ground Kashmiri or the pimentón. Stir well and then add the ginger. Add the tomato and go on cooking for about two minutes. Then add the spinach and mix well.
Now add the flour dissolved in water, stir and add the milk or cream. Make sure if it needs some salt and let it simmer for five minutes.
Finally, add the cheese, mix well and simmer for two more minutes.
You will have your paneer ready now. Serve when it is hot. Add the tomato slices over the dish. Enjoy!

Sunday, December 9, 2012

KOFTA


Ground lamb with spices. A recipe, with many variations, well known around the world, from the Mediterranean to India. Wonderful.

Ingredients:

1 teaspoon coriander seeds
1 teaspoon cumin seeds
2 cloves
1 teaspoon cardamom seeds
10 black peppercorns
A pinch of cinnamon
A pinch of nutmeg
½ teaspoon hot pimentón
½ teaspoon salt
½ small red onion, chopped
2 cloves of garlic, chopped
1 teaspoon parsley, chopped
1 pound ground lamb

Start preparing the wooden skewers. It is highly recommendable to soak them in water for half an hour at least.
Then prepare the spices. Put in a mortar the coriander, the cumin, the cloves, the cardamom and the pepper. When it is well ground, add the cinnamon, the nutmeg, the hot pimentón and the salt. Mix well.
Prepare the onion too. Chop it. Do the same with the garlic. Then, in a bowl, mix the ground lamb, the ground spices, the onion, the garlic and the parsley. Let it rest for 20 minutes.
And then start preparing your Kofta skewers. Take a piece of ground meat, already mixed with the spices, and make a cylinder around the skewer. Go on doing this, about three pieces per skewer, making sure that are firmly attached to the skewers.
The ideal thing is cooking the skewers on a grill, but you can also do it in an oven. If you do it in an oven, put the skewers on the brim of an oven tray. The oven must be preheated to 350ºF. Cook the Kofta in the oven for about 20 minutes. Do not overcook, though. Be careful.
You can serve it with pita bread and alioli sauce. Delicious. Enjoy!

Friday, November 23, 2012

ONIONED TUNA


This is lovely. Another recipe from my childhood. Onioned Tuna. I really love it. Tuna is so good. And in this recipe it is really delicious. Let’s cook

Ingredients:

A big cut of fresh tuna
1 onion, julienned
2 cloves of garlic, chopped
1 tomato, chopped
1 bay leaf
1 teaspoon parsley
1 teaspoon oregano
Some salt to taste
Some freshly ground black pepper, to taste
Some extra virgin olive oil
1 tablespoon red wine vinegar
½ teaspoon sweet pimentón

To start with our recipe, heat a pan with olive oil. When it is hot, add the onion and sauté it. A couple of minutes later add the garlic and the tomato. Add the spices too: the bay leaf, the parsley and the oregano. Then add the vinegar and water if it is necessary. When the tomato and the onion are a bit done, add the tuna to the pan. Cook it about five minutes on one side and then do the same with the other side. Add the pimentón just at the last moment. Add salt and pepper to taste. Cover the pan and let it simmer for a couple of minutes. The fire must be very low. You can even turn the fire off. It depends on the piece of tuna. If you cook the tuna in small pieces, it will be faster. But I love those big tuna slices.
Serve hot, though cold it is also delicious. And enjoy!

Monday, November 12, 2012

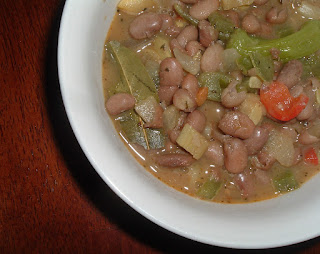
PINTO BEAN STEW


I love bean stews. We should eat them more often. Today we will eat Pinto Bean Stew. Let’s cook.

Ingredients:

1 cup dry Pinto Beans
½ chopped green pepper
½ chopped red pepper
½ chopped squash
½ cup chopped celery
½ chopped onion
1 clove of garlic, chopped
Some extra virgin olive oil
Some salt to taste
Some freshly ground black pepper, to taste
2 bay leaves
½ teaspoon oregano
½ teaspoon thyme
1 teaspoon Jamaican curry powder
½ teaspoon sweet pimentón
1 Spanish green guindilla, chopped

To start with our recipe you will have to soak the beans in water overnight. Make sure you use enough water. The next day remove the water and put the water in a pan with plenty of water. Add some olive oil, just a teaspoon and a pinch of salt. Cook the beans, bringing them first to a boil and then turn down the fire. Cook them till the beans are soft. When they are done, remove but keep the liquid.
While the beans are being cooked, we will prepare the vegetables. Heat some oil in a pan and sauté the the pepper, the celery and the onion. Add the squash, the garlic and the bay leaves three minutes later. Then add the oregano, the thyme, the curry powder, the pimentón and the guindilla too. Add salt and pepper to taste. Now, add the contents in the pan to the beans. And now we can add the liquid we want to our beans, according to your taste. If you like soup, add more liquid. If you prefer your beans thicker, add less liquid. Simmer for some minutes. And then serve and enjoy!

Monday, October 15, 2012

MARLIN WITH GRILLED VEGETABLES AND ROMESCO SAUCE


A wonderful fish for today. Not very known but really good. I love this kind of fish. Firm and perfect for grilling. Let’s go to the kitchen.
Ingredients:

1 tomato
3 green onions
2 cloves or garlic, chopped
Some extra virgin olive oil
¼ teaspoon thyme
¼ teaspoon parsley
Salt to taste
Some freshly ground black pepper, to taste
2 good pieces of marlin

First thing is preparing the vegetables. Cut the tomato in stripes. Chop the garlic. Do not chop the green onions. Keep them long.
Heat some oil in a grill pan and when it is hot, sauté the vegetables lightly. Once done, reserve them. Now we will cook the fish. Sauté the pieces of marlin in the same grill pan. Do not cook it too much. But do it on both sides. At the last moment add the vegetables to the pan. And it will be ready to be served.
Serve with Romesco Sauce and good bread. Delicious. Enjoy!

Tuesday, October 9, 2012

ROMESCO SAUCE


This is one of my favourite sauces. Romesco Sauce. You can use it with fish, meat, vegetables… A very rewarding sauce. Let’s cook.

Ingredients:

2 dried red peppers
2 small mature tomatoes
1 garlic bulb
12 roasted almonds
12 roasted hazelnuts
A slice of bread
Some extra virgin olive oil
Some red wine vinegar
½ teaspoon pimentón
Salt to taste
Some freshly ground black pepper, to taste
A pinch of cayena pepper

First we will have to prepare the dried red peppers. Soak them overnight in a container. The next day, open them and remove the seeds. Then take the flesh of the peppers and discard the skin. Reserve the flesh.
The next step is roasting the tomatoes and the garlic. The oven has to be preheated to 400ºF. Roast the tomatoes for about 20 minutes and the garlic bulb for 10 minutes. When they are roasted, remove the skin from the garlic and cut them in little pieces. Wrap the tomatoes in paper for 10 minutes and then remove the skin from them. Get rid of the tomato seeds too. Then cut them in little pieces.
Take the bread and fry it a bit with some drops of olive oil. Then break it into pieces and reserve.
You can use a food processor or a mortar. I will use a food processor because it is more convenient.
Once we have all the ingredients ready, put them in a food processor. Add a bit of olive oil and a bit of good red wine vinegar. And start blending. What we have to do is blending, stopping and stirring the sauce so that we get a well blended sauce. And add more olive oil little by little. You might have to add some more vinegar too. Check that too. If you want, you can add some spicy ingredients, but do not add too much.
The secret is to taste the sauce so that we get the correct taste and consistency. You can get the consistency you like. I do not like it to be too soft. It is important not to add too much oil or vinegar at the beginning. It is better to be adjusting it in the process. Add some salt and freshly ground pepper to taste.
You can serve the Romesco Sauce once it is prepared or preserve it in a glass jar and let it rest. It is tastier after some time. Really delicious. Enjoy!


Friday, September 21, 2012

BAGUETTES


Bread!!! I love bread. And I love Baguettes. I grew up with this kind of bread and that cannot be easily forgotten. Let’s make bread!

Ingredients:

1 cup and 1 tablespoon water
2 tablespoons extra virgin olive oil
1 tablespoon sugar
½ teaspoon salt
3 cups bread flour
2 ¼ teaspoons yeast

I normally use my bread machine to make the dough for my baguettes. You can make it by hand too. Or even a stand mixer or a good food processor that can make dough bread.
I used the bread machine and I put the ingredients in this order: water, oil, sugar, salt, flour and yeast. I selected the program just to knead the dough and turn the bread machine on. The machine will do its job and then it will let the dough grow.
If you want to make your dough by hand, you can do it placing the flour on a table making a well with the water inside. Add the rest of the ingredients and make the dough. And then you will have to knead the dough properly. Knead and knead till the dough is elastic. Let it rise in a bowl covered by a wet cloth.
It is important to let the dough rest and rise. To make good bread you cannot do it in a fast way. Good bread takes its time. Let it rest for an hour or so.
Now shape your Baguettes and let them rest for an extra 30 minutes on the oven tray.
A word about humidity. I like crusty baguettes. And to get that you need to have humidity in the oven. This is sometimes difficult to get. The problem is that if you do not have an oven that can provide the necessary humidity, you will have to take care of it. What I do is opening the oven two or three times and spraying the baguettes with some water. By doing this you give humditiy but you also lower the temperature in the oven while opening the oven door. You have to be quick so that the temperature does not get too low.
Let’s come back to our baguettes. Once they have rested, we will start baking them. Make some cuts in the baguettes. Put the baguettes on an oven tray. This tray must be lightly greased. The oven must be preheated to 450ºF. Put another tray with water at the bottom of the oven. Try not to open too much the door of the oven when you spray some water on the baguettes. And be quick doing it. Losing temperature is not good. The time of the baguettes on the oven will depend on the times you open the door and on the water you spray. Minimum 30 minutes. Make sure the bread is well baked.
And then you will have your homemade Baguettes. Crusty Baguettes!
Enjoy!

Sunday, September 9, 2012

CARDAMOM BROWNIES


Brownies! Chocolate Brownies with a plus. Cardamom! You are going to love these brownies.

Ingredients:

5 ounces chocolate, sweet or bittersweet, finely chopped
7 ounces unsalted butter
4 eggs
4 ounces sugar
The seeds of 12 cardamom pods, ground in a mortar
3 ½ ounces flour
1 cup of almonds, roasted and chopped

First we will melt the chocolate. It will be easier if you have it in little pieces. You can melt it in the microwave oven or using the bain-marie method. Anyway, you have to be careful so that the chocolate does not get burned. I prefer to use a good chocolate without milk, but, of course, you can use chocolate with milk. Use the one you prefer. Once it is melted, reserve.
Then we will put the butter in a big bowl. If we melt it a bit previously, the better. Then, add the eggs, little by little, mixing them with the butter. The next thing is adding the sugar and mixing well. Then, add the cardamom, well ground in a mortar. Mix well and add the melted chocolate. We only will have to add the flour and the almonds. Mix again so that everything is ready for the oven.
Now we can put it in an oven tray that must be lightly greased with a little butter. Put the tray in the oven, preheated to 350ºF. Bake for about 25 minutes, then turn the oven off but let the tray in the oven for five more minutes before taking it out. Let I cool a bit and cut in squares to get your delicious brownies. Now you will have your brownies. Not for long! Enjoy!

Sunday, August 19, 2012

GRILLED SARDINES


Sardines! So many memories! We should eat more fish. And more kind of fish like Sardines. They are delicious and healthy. If you are not eating them, you do not know what you are missing! Let’s cook them today!

Ingredients:

4 sardines
Some salt
Some extra virgin olive oil
2 cloves of garlic, chopped
Some fresh parsley, chopped
½ teaspoon pimentón, sweet or hot, to taste
Some drops of lemon juice

First, clean the sardines. Remove the head and the inner parts. Basically everything. We only want the fillets. You can also cook them without removing anything if the sardines are small. They are good in both ways. But I prefer to have just the fillets.
Then put some extra virgin olive oil in a grill pan. Just some drops. Heat the pan and then put the sardines. Fry them around three minutes and then turn them and cook them for 2-3 more minutes on the other side.
In the meantime, you can prepare a delicious seasoning. Mix three tablespoons of extra virgin olive oil with the garlic, the parsley and the pimentón. You can use sweet or hot pimentón. It is your choice but I prefer the hot one. Add some drops of lemon juice and mix well.
And everything is ready for our sardines. Serve them along with the seasoning. Use it generously on the sardines. And why not? Serve them with a good white wine. A recommedation: Portuguese Vinho Verde. I love it. You will. Enjoy!

Sunday, August 5, 2012

FISH AND SEAFOOD BISQUE


Soup. Soup. Soup. A Fish and Seafood Bisque for today. This is delicious. And really comforting and rewarding. Let’s cook.

Ingredients:

A fillet of amberjack
10 peeled shrimp
2 bay leaves
3 tablespoons chopped carrot
3 tablespoons chopped onion
3 tablespoons chopped celery
4 tablespoons chopped tomato
3 tablespoons frozen corn
1 clove of garlic, chopped
2 tablespoons butter
½ liter milk
1 teaspoon cornstarch
1 teaspoon sherry
Some salt, to taste
Some freshly ground black pepper, to taste
1 teaspoon sweet pimentón
1 teaspoon thyme
Some drops of Tabasco

First we will have to prepare the fish. Clean it and remove the skin. Then cut it in little pieces. Then we will prepare and cut the vegetables.
And now to the pan. Put the butter in a pan and heat it. When it is hot, add the bay leaves, the onion, the carrot and the celery and cook for two minutes. Then add the tomato, the corn and the garlic. Cook for three more minutes. Now we can add the fish and the shrimp. Mix the cornstarch with the milk and then add it to the pan too. Some drops of sherry are perfect too. Add them now. And the following to add to our delicious bisque is the salt and pepper, the pimentón and the thyme. Turn the fire low and cook for some minutes. When the fish is cooked the bisque will be ready. If you want it to be a bit thicker, you can add more corn starch. But be careful.
I like to add some drops of Tabasco. It makes it tastier.
Serve hot and enjoy!

Tuesday, July 17, 2012

‘SAMOSAS' DULCES DE COCO Y GUAVA


Samosas dessert. Something different. Coconut and Guava inside a samosa. Let’s cook.

Ingredients:

Some spring roll pastry
One coconut or some frozen coconut
4 tablespoons sweet guava paste
4 tablespoons sweetened cocoa powder
A teaspoon of vanilla
One egg or some milk
Some confectioner’s sugar

First we will thaw the spring roll pastry that we will need. Leave it thawing on a kitchen cloth. Prepare the coconut. If it is fresh, cut it in little pieces, almost ground. Put the coconut in a container and add the guava paste, the cocoa powder and the vanilla. Mix well.
Now you will have to prepare the pastry. And fill it. First, put a pastry sheet on a wet cloth. Then fold it in half. Now fold the left bottom corner to the top. Next, fold the left top corner to the right bottom corner. With this, you will have a cone which can be hold while you fill it with the filling using your other hand. Then wet the ends of the pastry a bit and close the samosa. Repeat this with the rest of them. Keep them on a wet cloth.
When you have all the samosas ready, put them on an oven tray, slightly greased. Paint them with a beaten egg or with some milk.
Then the only then we have to do is taking the samosas to the oven. Have it preheated to 300ºF. Have them there for about half and hour. When they are ready, you will only have to serve them. Do this adding some confectioner’s sugar. A different dessert. Enjoy!

Saturday, July 7, 2012

SAMOSAS


I love them. Samosas are one of those delicacies from India that everybody should eat at least once in their lives. Although that would be difficult. Eating only one samosa. They are so good. There many kind of samosas. I will cook vegetarian samosas today. But there are with meat too. Let’s start.

Ingredients:

1 potato
¼ onion
4 tablespoons corn
4 tablespoons chopped squash
3 tablespoons red pepper
2 tablespoons green pepper
1 small green chili
1 tablespoon chopped fresh ginger
1 tablespoon chopped garlic
Some vegetable oil
Some spring roll pastry
½ teaspoon cardamom
½ teaspoon garam masala
½ teaspoon cumin
½ teaspoon coriander
½ teaspoon turmeric
½ teaspoon dried cilantro
¼ teaspoon dried mint
½ teaspoon Kashmiri red chili powder
Some salt to taste
Some freshly ground black pepper

I will cook my Samosas with spring roll pastry. It is not the most common way, I know. Normally you should do it with maida dough. But the results are quite good and the Samosas will be crispy. Sometimes samosas are soggy. And these ones will not be. I promise.
First we will cook the potato. Wash it and peel it. Boil it in a pan and reserve. Then prepare and cut the vegetables.
Make sure you have the spring roll pastry ready. We do not want it frozen when we are ready to cook. Keep it on a clean cloth.
Now we will prepare the filling. To do that, heat some vegetable oil in a pan. Then add the onion and the peppers and cook for a couple of minutes. Now add the squash, the garlic, the ginger and the chili. Go on cooking it.
We also have to prepare the spices. Mix and blend them in a mortar. Then add it to the vegetables.
Mash the potatoes lightly. Then add them to the vegetables. We will have the filling ready now.
The next step is filling the samosas. It is not difficult. First, put a pastry sheet on a wet cloth. Then fold it in half. Now fold the left bottom corner to the top. Then fold the left top corner to the right bottom corner. With this, you will have a sort of cone which can be hold while you fill it with the filling using your other hand. Then wet the ends of the pastry a bit and close the samosa. Repeat this with the rest of them. Keep them on a wet cloth.
Heat some oil in a pan. And when it is hot enough, fry the samosas. Do it in several batches if needed. Once fried, leave them on kitchen paper towel because we do not want too much oil.
And the Samosas will be ready. Serve them as a side with an Indian curry. Perfect with a chutney. Enjoy!


Friday, June 15, 2012

ARAGONESE LAMB


Back to my roots. The ideal thing would to cook this with Ternasco de Aragón, a very tender young lamb from Aragón, my home land. But as I could not get that, I will cook it with the lamb I could get in the supermarket. Let’s go to the kitchen.

Ingredients:

½ lb lamb steak
2 potatoes
Some extra virgin olive oil
1 clove of garlic, chopped
½ teaspoon oregano
½ teaspoon thyme
½ teaspoon rosemary
½ teaspoon parsley
¼ teaspoon sage
Some salt to taste
Some freshly ground black pepper

To start with our recipe, wash and peel the potatoes. Then slice them. Get ½-inch slices. Heat some extra virgin olive oil in a pan, and when it is hot, start frying the potato slices. Do it in both sides but do not fry them completely because they will go to the oven later. Get rid of some of the oil in the potato slices.
Then put the potato slices on an oven tray. The lamb must go on top of the potatoes. Add some salt, black pepper and some drops of olive oil. The oven must be preheated to 350ºF. Let it cook and have a look from time to time. If you see that the meat is too dry, you can add some drops of water or more olive oil. The lamb will be ready in 30-45 minutes, depending on how thick the pieces are. Always have a look to the meat in the oven. You do not want it too done.
Meanwhile you can prepare a seasoning with some extra virgin olive oil, the garlic and the herbs and spices: oregano, thyme, rosemary, parsley, sage, salt and black pepper. Mix this well. Five minutes before the lamb is done, add the seasoning to the meat, on top of it. Make sure the herbs are not burned.
Serve the lamb with the potato slices. Something delicious. Enjoy!

Tuesday, June 5, 2012

BAKLAVA


A dessert from the Mediterranaean. This is really good. I love these Baklava and one day I decided to try to make them myself. Not bad indeed. I will show you how. It is some work but in the end the resultas are really good.

Ingredients:

A packet of filo dough
Some butter, unsalted and melted
2 tablespoons chopped pistachios
2 tablespoons almonds, peeled and chopped
2 tablespoons chopped hazelnuts
2 tablespoons chopped raisins
½ ground cinnamon
½ cup brown sugar
1 tablespoon lemon juice
1 tablespoon orange juice
1 tablespoon rose water or orange blossom water
1 tablespoon honey

To start with our Baklava we will prepare our filo dough. I buy it frozen. Making it at home is quite hard. And the one you can buy frozen is really good. Filo dough is very thin dough. You use it in many layers. It is very fragile so you have to be very careful while handling it. You can buy frozen filo dough in almost any grocery now. You will have to let the filo dough thaw by itself. Follow the instructions in the package. Once it is ready, reserve it.
While the filo is thawing, we will make the syrup. To do this, take a small pan and put in it the brown sugar, ⅓ of the volume of sugar in water, that is to say, ⅓ of half a cup water, the rose water or orange blossom water and the lemon and orange juice. Heat it, and when it boils, let it simmer for about five minutes, stirring with a spoon. Once it is done, let it cool and when it is cool enough, put it in the fridge. The syrop must not be too thick.
Now we will prepare the filo and its filling. For the filling, take a bowl and put all the nuts there. Add the cinnamon too. Mix well with some drops of honey so that the filling is a bit moist. You have to make enough so that there is plenty of it for the filling.
We will come back to the filo dough now. Prepare a shallow oven container. Spread some melted butter on it. Take a sheet of filo dough and put it in the container. Brush it gently with melted butter. Do this layer by layer. A layer of filo, a layer of butter, a layer of filo… Do not overuse butter, though. You just have to put a thin layer of butter to wet the filo. It is hard work, but in the end, the the results will be amazing. When you have used half the filo, it will time to spread the nut filling. I normally make only one layer of filling, but if you want, you can divide the filling in several layers. Once you have spread the filling, go on with the layers of filo and butter, as we have done previously. And with this, we will finish preparing the baklava.
Turn on the oven to 350ºF. Put the tray with the baklava inside the oven. Bake it for 45 minutes. When the baklava gets a golden color, take it out of the oven and then it is the time of pour the cold syrup over it. Let it cool at room temperature and when it is cold enough, put it in the fridge. Now the syrup will have to wet the filo and the filling.
The secret is the difference in temperature. If the filo with the filling are hot, the syrup has to be cold. It can also be done the other way around: the filo and the filling cold, and the syrup hot. I have not tried it this way, though.
To serve it, cut the Baklava in little pieces with a very sharp knife. Now you only have to do once thing. Enjoy your Baklava!
Saturday, May 19, 2012

SCOTTISH GUINNESS STEW


A stew for today. And one with a beer touch. And not any beer. We are talking about Guinness. A stew made with Guinness. Delicious. Let’s cook!

Ingredients:

1 chopped carrot
1 small chopped onion
2-3 cubed potatoes
2 bay leaves
1 clove of garlic, chopped
½ can Guinness Stout (not bottled)
Some beef stock or water (better results with stock, of course)
1 pound stew beef, cubed
1 teaspoon dried thyme
1 teaspoon dried rosemary
1 teaspoon dried parsley
Some extra virgin olive oil
Some salt to taste
Some freshly ground black pepper
Some flour

I will use the pressure cooker to make the stew. However, you can do it in a regular pan too. And even in a crock pot with really wonderful results. Slow is better from my point of view, but if you are in a hurry, you can use the pressure cooker. I will show you how today.
First we will prepare all the vegetables.
Get a Guinness can. Do not use a bottle.
Then we will seal the meal a bit in the pressure cooker using some drops of extra virgin olive oil.
Then we will add carrots, onion and potatoes and cook for a minute. Add the rest of ingredients except the flour and cover it with the beer and the beef stock. Close the pressure cooker and follow the instructions to cook the stew for about 20 minutes.
Once it is cooked, and when the pressure cooker is ready to open, remove the bay leaves. Then add some flour, spoonful by spoonful, stirring thoroughly to make the stew thicker. Add only the necessary flour to get this. Do not use too much flour. Let it cook for a couple of minutes.
And it will be ready to be served. A wonderful stew. Enjoy!

Friday, May 4, 2012

EGG ROLLS


Chinese comfort food. Egg Rolls. Who has not eaten Egg Rolls? I will make my own Egg Rolls today. Let’s go to the kitchen.

Ingredients:

Egg Roll Wrappers
1 chopped carrot
¼ cauliflower or white cabbage
1 small can beansprouts or fresh ones
1 small can water chestnuts
1 tablespoon soy sauce
Some salt to taste
Some freshly ground black pepper
Some vegetable oil

To start with the preparation, chop the carrot. Scald the cauliflower or cabbage for some minutes. Then drain and shred it. Put carrots, cauliflower, beansprouts, water chestnuts and black pepper in a container. Add the soy sauce and mix. Add some salt if needed.
We will have the egg roll wrappers ready. Thaw the amount you consider you will be using. Put a wrapper on a surface with one corner pointing at you. Pour about three tablespoons of the mixture across the wrapper, parallel to you. Fold the corner closer to you to cover the mixture. Do the same with the right and left corners. Finally do the same with the remaining corner. Do this with all the wrappers and the filling.
Then the only thing we will have to do is frying the Egg Rolls. Heat some vegetable oil in a pan and deep fry the rolls. Do this in badges so that the rolls do not stick to each other. When they are brown, remove from the pan and let them get rid of some of the oil by putting them on kitchen paper towel.
Now you have your rolls ready. You can serve them as an appetizer. And you can serven them along with some oriental dish.
Rewarding and delicious. Enjoy!

Friday, April 20, 2012

CHINESE SAUSAGE STIR-FRY


I will not pretend to make this sound as a Chinese recipe. I use Chinese Sasauge. It is different, but it is good. You can try it. Let’s start.

Ingredients:

1 egg
½ chopped onion
½ chopped carrot
½ chopped red pepper
½ chopped green pepper
½ chopped squash
2 cloves of garlic, chopped
1 tablespoon chopped fresh ginger
7 small Chinese Style Sausages
A bunch of bean sprouts
½ cup sliced canned water chestnuts
Some vegetable oil
1 teaspoon soy sauce
1 teaspoon duck sauce or plum sauce
Some salt if needed
Some freshly ground black pepper
Some rice vermicelli

First we will prepare an omelette. I bet you can make it. Frying pan, oil, beaten egg. Easy. I will not expand on it. Once you have done it, reserve it.
Cook the rice vermicelli following the instructions in the package. Easy too. Reserve it too.
The next thing will be preparing the vegetables. We will prepare the sausages too, slicing them.
And then we can go to a wok or frying pan. Heat some oil and when it is hot, add the onion, the peppers and the carrots. Cook for a three minutes. Then we will add the squash, the garlic and the ginger. Cook for a couple of minutes and add then add the sausage. These Chinese Sausages must be cooked. You can’t eat them without cooking them as it happens with some Spanish chorizos. After two more minutes, we will add the bean sprouts, the water chestnuts, the soy sauce and the duck sauce. Go on cooking for some minutes. Then, add the omelette cut in stripes.
You will have everything ready then. Serve it hot along with the rice vermicelli. Instead of rice vermicelli you can use rice if you prefer it. Enjoy!

Sunday, April 8, 2012

DULCE DE LECHE


A delicious danger for dessert today. Dulce de Leche. A danger because it is delicious but very caloric. One has to be responsible when eating Dulce de Leche. If you want to take the risk, here you have the recipe. In fact this is like a fake Dulce de Leche recipe. The original one implies more work. I am giving you a recipe which simplifies the way of making it. But it is really good. Very tasty. Let’s cook.

Ingredients:

A 14oz can sweetened condensed milk (in fact, if you want, you can use 2 or 3 cans if you want)
Some water for the pressure cooker

Not many ingredients, right? That is because this is a very easy recipe. I normally do it with one can, but if you want, you can put two or three cans in the pressure cooker. Again, think about your weight.
First thing is preparing the can or cans of condensed milk. Remove the label from the can or cans. Then put the can or cans in the pressure cooker. Put them horizontally, not vertically. Cover the cans with water. Close the pressure cooker and, starting to count when the cooker starts steaming, have it cooking for 50-55 minutes. When the time is over, wait for some minutes and then open the cooker. The water will be very hot, so the best thing is to let it cool by itself. It you want, you can remove the water. But be careful when you are doing it. Anyway, you will have to wait for several hours. It will take time. When it is completely cold, store it in a cold place or open it.
And from that moment, it is up to you. Be responsible. Do not eat too much at a time. Use it as an ingredient to make different desserts. And from time to time, indulge!
Enjoy!

Friday, March 16, 2012

FALAFEL


One of my favourite foods. Falafel. A wonderful dish with chickpeas and sometimes with fava beans too. You can find it in many countries surrounding the Mediterranean Sea. They know how to eat over there. Let’s make Falafel.

Ingredients:

A 15 oz chickpeas can
A 15 oz fava beans can
½ chopped onion
2 cloves of garlic
1 teaspoon cumin seeds
1 teaspoon coriander seeds
1 tablespoon parsley, fresh if it is possible
Some flour, 2 or 3 tablespoons
Salt to taste
Some freshly ground black pepper
Some vegetable oil
Pita bread
Pickles
Sliced tomato

First we will have to make the paste for the Falafel. We will use chickpeas and fava beans. Open the cans and wash the chickpeas and beans a bit. Chop the onion and the garlic. Blend the cumin and coriander seeds in a mortar. Put the chickpeas, the fava beans, the garlic, the onion, the parsley, the cumin and coriander in a blender and start blending. You have to get a paste. If the mixture is not thick enough, you can add more flour.
Then we will have to make the balls with the paste. It is helpful to make them with the help of a tablespoon.
The next step is frying our falafel. Heat some oil in a frying pan. When it is hot, fry the falafel in batches. Fry them on both sides. Once they are done, leave them on kitchen paper towel or on a metal rack to get rid of extra oil.
Then we will only have to prepare our pitas. Heat them for a couple of minutes in an oven. And after that, just put some pieces of falafel inside along with the sauce, tomato and pickle. You can add some lettuce if you want. In fact, you can add other favourite vegetables. Delicious. Enjoy!

Monday, March 5, 2012

BEEF AND PROVOLONE SANDWICH


Today we will prepare a delicious sandwich. A Beef and Provolone Sandwich. Perfect for lunch. But very good for dinner too. Let’s start.

Ingredients:

2 pounds Angus beef chuck
2 cloves of garlic
Salt to taste
Some freshly ground black pepper
Sliced tomato
Some sliced onions
Some pickles
Some sliced Provolone cheese
Your favourite bread
Your favourite sauce, optional

First slice the garlic. Then we will prepare the meat buy making some cuts in the Angus beef chuck. Do not make them too deep. Now put the slices of garlic in the cuts of the meat. Put the meat in a pressure cooker and add some salt and pepper to the meat. Cover the meat with water and cook the meat in the pressure cooker for about 30 minutes, starting counting when the pressure cooker begins to steam. Let it cook and when you open the cooker, if you see that the meat needs more cooking, you can do it with the cooker open. You can remove the garlic if you do not want it.
Carve the beef, as finely as you can.
Once you have the beef cooked and carved, you will only have to prepare the sandwich. Take your favourite bread and put pieces of beef inside. Then add tomato, pickle, onion and cheese. You can take the sandwiches and put them in the oven for a couple of minutes. This will melt the cheese.
And then you will have your sandwiches ready. You can add some sauce if you want. I do not think it is necessary though. But make it your way. Get a beer. Or two.
Enjoy!